Showing posts with label Paints. Show all posts

Saturday, 23 June 2018

"Behind the Curtain..." :-)

Behind the curtain...... :-)
Pictures from my studio space.
 As you can see, nice bright corner with plenty of natural Antipodean light.
 Not enough room on the desk for all the paints with current storage solution - couple of boxes of Reaper paints on carpet next to desk.
 I use the largest Masterson's wet palette I could source locally - paint dries way too fast in summer here, plus this allows me to easily come back to project colours day by day.
 I also use an A4 sized disposable palette for inks, washes, metallics, gesso, pva etc.
I use a real assortment of brushes, from cheap & cheerful Chinese synthetics to Winsor & Newton Series 7. The blocking in is done with the round synthetics - as large a size as I can manage, which can be up to size 10. The flesh areas are done with the WN S7 size 1 & 0, I also use these for fine detailing in other parts of the figure. I always use the synthetics for metallic paints.


Sing out if you want to ask me any questions. I really like how each of us in the hobby has a different working space but share so much in common.

All the best,
John.

Saturday, 23 January 2016

Dad's Army WIP Part 5...Painting British Battledress

Here's how I paint British Battledress. This is over the base I created with Vallejo English Uniform, washed with Secret Weapon Blue Black. I know other folks will have combinations of colours that they like, but these are the colours that I have found work best for me:

Vallejo English Uniform, Green Brown, and Khaki.
English Uniform is painted back over the figure, leaving the wash/foundation layer in the creases and where shadows are more likely.
First layer is English Uniform.
 Next I use Green Brown for a highlight on areas that would be more exposed to light that is roughly overhead. This is demonstrated on the back of the figure below.

Green Brown over English Uniform
 The final highlight is Khaki, applied to areas that would get the most light - knees, tops of arms, cap, etc.
Khaki Highlight -front

Khaki highlight -back

The next post will show this set of figures with all the details painted up, including eyes, webbing, weapons, and "Molotov" Bob's bottle :-)

Thanks to those who have left comments so far, always great to know that others find this stuff useful.

There will be no post tomorrow, hope to be back with another on Monday.


Friday, 22 January 2016

Dad's Army WIP Part 4...How I paint the fleshtones

G'day all, the next exciting episode for you! This time I'm giving a breakdown of how I'm doing the flesh areas on these figures. These are the typical colours that I use for "European" skin-tones....well, unless they've been stationed in the Western Desert for a while ;-)

I'm going to focus on a single figure so I can demonstrate my process a bit better. I shall call him "Molotov" Bob! Below is Bob with his foundation colours plus his various washes:


The first colour of choice is Reaper Bright Skin Shadow, applied with a No.1 da Vinci Kolinsky sable brush.


Here's what Bob looks like after this layer:


Notice that the foundation/wash areas have been left in the areas around the mouth, nose, ears, below the chin, at the wrists, and between the fingers (click images to enlarge).

My next colour layer is Reaper Bright Skin:


Here's Bob after his this layer:


These layers are placed on the edges of the ears, hand, knuckles, nose, top of cheekbones, part of forehead, and fine lines above the top lip.

For the final highlight I use Reaper Bright Skin Highlight and a size 0 brush (same make /type as before, just finer).


Now some pictures of Bob with these final touches to the flesh areas:


One of the keys with the final highlights is not to be heavy handed, small, fine strokes or dots will do. Place these highlights on the tip of the nose, top of the cheekbone, tips of ears (if not under a hat), top of forehead, knuckles, top surface of hand, and fine lines above top lip.
I used to put highlights on the chin, but after some further reading and observation this seemed unnecessary for this scale - unless you are painting a figure with a hugely exaggerated jaw/chin.

Here's the batch with the flesh areas done. Painting the eyes/spectacles and hair is done later.


I hope this proves informative, as well as an interesting comparison with what the figure looked like with just the washes.
In my next post I hope to bring you a step by step of how I paint the Battledress, including the triad of colours I use.

All the best,

John.

Thursday, 21 January 2016

Dad's Army WIP Part 3...Washes

OK, here's the part where the washes get applied. Rather than go for an overall wash in one colour, I have opted for four coloured washes for different parts of the figures. Washes not only put some handy shading in creases etc., they also create another colour. To my  mind this works out as a pairing of lining-in & glazing;  how much of this new colour you want to leave showing is up to you. When you look at the pictures at the end of the post you will see how the creases and shadows have been defined, and new colours created by overlaying the semi-translucent wash over the top of the foundation colours, (you may want to compare these with how they looked in the previous post).

The first wash I apply is the flesh wash. My flesh wash is a homemade mix - see picture below for a visual of the mix. it is composed of mostly Daler Rowney Red Oxide acrylic ink, with some Reaper Brown Ink & Reaper Flow Improver (I can't tell you the exact proportions because I don't know them :-), I just stopped when I thought it looked about right.)

Flesh Wash combo

Next up, the majority of the uniform gets a wash of Secret Weapon Blue Black - I think this colour is excellent for British Battledress, to my eye it is complimentary. I would not use this coloured wash over German Field Grey uniform for instance, I would probably use a brown instead. Over a red uniform I would use Secret Weapon Green Black.

The next wash to be applied is Secret Weapon Sewer Water (don't worry, it doesn't smell like a sewer). This is put on the helmet and the boots.

My final wash is P3 Armour Wash, this is applied to the weapons - doesn't matter if it goes on the woodwork too, that can get tidied up later.
I like this product from P3 for all metal work, works a treat. Once it's dry you can always go back over with some metallic paint if you want some extra shiny bits :-)


Below are the brushes I use for most of my washes. They are soft brushes with natural fibres, but nothing fancy like sable.


Here's what the figures look like once their washes have dried:


A close up of some of 'em:


They look much darker now, but not too dark. In the next stage I will go back over the figures with original colours plus some new ones, leaving some of the glaze colour where I want it.
In the next post I will show you how I paint the flesh on these figures.

All the best,

John.

Wednesday, 20 January 2016

Dad's Army WIP Part 2...blocking colours

OK, this is the bit where I list the basic colours I've used for blocking in. These act as the foundation colours over which washes will be applied, followed by overpainting, highlighting and detailing.

I find it hard to take decent pictures at my wee workspace, so please bear with me :-)

Below are the first thirteen figures with all their foundation colours blocked in.


These are the colours I have used:

  • Reaper HD Sunburn Flesh for skin areas
  • Vallejo Brown Violet for helmets
  • Vallejo Black Grey for boots and bayonet scabbard
  • Vallejo English Uniform for battledress & caps
  • Vallejo Green Ochre for helmet chin straps and extra bags (not service respirator bag)
  • P3 Thrall Flesh - regular webbing
  • Vallejo Yellow Green - Service Respirator bags
See picture below.


Paints continued...

  • Vallejo Mahogany Brown for Rifles/Gun stocks
  • Vallejo German Grey - gaiters & metal work on guns
  • Reaper Ruddy Leather- rifle slings
  • Vallejo Olive Grey- scarves on a couple of the figures
  • Vallejo German Cam. Black Brown  for hair
  • Reaper Peacock Green for Molotov Cocktail bottle
See picture below.


That's quite a lot of different colours for what looks like a fairly straightforward uniform I guess :-)

Below is a picture of the wet palette that I use for my main painting tasks. Hmmm, think that paper might  need changing soon :-). I find a wet palette essential for my work, especially in the hot corner of the living room where my workspace is - our summer weather dries the paint out fast.


My next post will be about the wash stage. I will be using four different wash colours for this.
Cheers,
John.

Tuesday, 19 January 2016

Dad's Army WIP Part 1

This is my first work in progress post for the Dad's Army project. My plan is to take the pictures and post them next day, so what you are seeing are yesterday's photos.
Today's post is fairly straight forward prep stuff - filing, gluing & undercoating.
Next post will give you the stuff most of us are interested in when looking at a painting post - "What colours do you use?"

I am starting out with two blisters of rank and file Home Guard to "get my eye in".
The figures themselves don't need a lot of tidying-up, the casts are quite clean. A minor bit of filing on the bases, and a very gentle flex of the pewter to make sure they can all stand up on their own. There is a wee bit of clipping on two of the figures which have separate rifles with hand attached.

These are the basic tools I use for getting metal figures ready: a set of various shaped files; some clippers; and an old craft knife.

These two figures are carrying their rifles in their left hands. The rifles have the left hand cast on and just need a bit of superglue to affix them. They will be left to cure and undercoated the following day.
 Undercoating...
Nowadays I undercoat all my figures with the excellent Background range of paints from Derivan Matisse. Previously I used their Pale Grey, but now I prefer the slightly darker green-grey of Gum Tree Green (they are an Aussie paint manufacturer). The Background paints are designed for sealing artists canvases or boards prior to painting, and so not only give a great seal over the figure, but also a good "tooth" on which to apply paint. I am not a fan of black undercoat, it does stuff to colours laid over it in my opinion, and I think white a bit too stark - I favour a neutral starting point, not too dark, not too light. The brush I use to undercoat with at the moment is an inexpensive No.10 synthetic round. Undercoating brushes get worked pretty hard, so I don't advise using your best sable :-)

After giving the undercoat a thorough shake I get some paint from the inside of the lid and lay it on my disposable waxy paper palette, and start undercoating. Sometimes little patches get missed in the undercoating stage, that is where washes and lining in come into their own in the latter stages.
I picked up the pad of disposable palette paper from an art shop, it has been really useful.

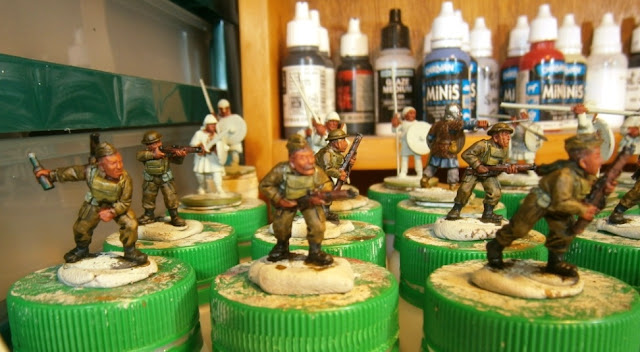
The figures are stuck down with Blu-Tack onto empty pill bottles or similar - my favoured ones were some sort of yoghurt drink. The bottles have some rocks in them to prevent them from toppling like dominoes :-)
Undercoat/Sealer & undercoating brush. Undercoat is dispensed onto the disposable paper palette.

Here are the figures with their undercoat on - first two rows,  figures in the back are part of my slow burn Anglo-Saxon project. The two figures on the left are waiting for the super-glue to cure. Rest of the blister packs have been organised into separate clip-seal bags.


Stay tuned for the next post where you will find out what my base or blocking colours are :-)

Tuesday, 5 January 2016

Pippin the Paint Puppy....Plans, Ponderings & Ramblings


Pippin the puppy has joined Sarge HQ! - she is a Maltese-Shitzu cross, and in the picture above you can see her fallen asleep on the foam padding of one of my Reaper paint cases. A promising sign from young Pippin, although I may have to get her started with something simpler at first, like undercoating figures. Pippin and I will be spending a lot of time in each others company, for although she is my wife's puppy officially, I will be at home with her the most, painting away :-) I hope she likes listening to Meeples & Miniatures & Wargaming Recon when they appear with new episodes for 2016.

I managed to get a wargame in on New Years Day with my old friend James, you can read his AAR here: https://wargamespavilion.wordpress.com/2016/01/03/dark-age-lion-rampant-aar/
It was a fun game of Lion Rampant set in the Dark Ages with my Anglo-Saxons against his Vikings - great fun was had, even though I lost :)
I did a wee bit more painting for myself during the Christmas/NY break, getting some more of my Anglo-Saxons done. Thankfully I had plenty of fully painted troops ready to do battle against James.

I notice lots of my fellow wargamers are talking about their hobby plans for 2016 & reflecting back on 2015, so I thought I'd make some brief jottings of my own...

  • 2015 - Enjoyed painting lots of figures for other folks, as well as some of my own - would've like to have done more, but my health started to pack it in towards the back end of the year. Started some new medications, got new doctors, and am making progress....somewhere in a forward direction I hope :)
  • 2016 - Looking forward to painting more stuff for other folks, as well as slowly building my own collections. I am really enjoying painting some absolutely outstanding sculpts for my friend Barrie, they are stonkingly good Huron & Iroquois from the very talented Bob Murch - check them out if you can, the range is called "Flint & Feather". I have just today completed my first half dozen of them (pictures will follow in due course). You can look forward to seeing some more Modern and WW2 subjects being painted too.
  • For myself, I am keen to get hold of some terrain, buildings, civilians & animals to use in my Dark Age games. I have been eyeing off the resin buildings from Gripping Beast (they seem excellent value), as well as their ranges of civilians & livestock. I notice Warbases in the UK has some rather useful animals which would work too. Blacktree Designs also have some useful civilians. I'm open to suggestions from you guys for what else I should/could get for my Dark Age shenanigans. I wonder if anyone does a suitable Grendel for a Beowulf game, not sure what it looks like really? 
  • A new set of rules on the horizon for small Dark Age games is Blood Eagle, by the gents who produced "In Her Majesties Name". I've never played any games from their particular "stable", but after a bit of digging, these rules sound like another fun way of putting my Anglo-saxons to good use.Will have to wait and see.
  • Other news, I have finally got around to signing up for The Lead Adventure Forum after being a long time lurker, and what an interesting place it is. Quite a useful place for someone like me who tends to paint more than he games.


I could easily ramble some more, but will pause for now & leave you with another photo of Pip.

Shalom,

Jack.


Tuesday, 14 July 2015

Being friends with painting "Failures" & getting inspiration

Well this blog is called Jacksarge's Wargames Ramblings , but I don't tend to do much "rambling", mostly I stick up pictures of completed work. Today, I thought I would have a brief ramble about painting related stuff - painting & aesthetics are two of the biggest interests I have in this hobby after all.

I recently read a cool forum post on the Reaper Forum that linked to this excellent illustrated rambling HERE.
This is really aimed at creative stuff but can easily be applied to all sorts of endeavours in life.
Basically it's encouraging people to "have a go", try something new, and don't beat yourself up because it doesn't look "right" first time - or maybe not for a long time :-)

I think it's great to develop your own techniques for painting miniatures, building models, stuff like that. Sometimes we can get hung up on being a painting clone of someone else like Kevin Dallimore, Steve Dean, James Wappell....insert name of painter whose work you admire. I have tried to learn new stuff from these guys, and have tried those things out with varying levels of "success". This sort of stuff has helped to morph my painting from where it was in the 70's when Military Modelling Magazine was my only source of inspiration, to where it is now as a codger in his late 40's.

I find that it's not only looking at the wonderful work of others on the internet, magazines & books which helps stoke the creative fires, but also the materials. I do get excited by materials, I have to curb my paint purchasing habit- I really like paint, all those little bottles and pots lined up in their colours groupings or perhaps triads.....Brushes are something that I like to have a lot of too, in a variety of shapes sizes & materials. I recently purchased a few filbert brushes after listening to & watching videos of James Wappell in action with them- a very handy tool to have in the arsenal.
The point is, that these new materials have made me want to try out new things, or re-visit old things that I may have bungled previously.

A Snapshot of my painting area

More Paint! These are my Reaper cases.

Brushes and stuff...

I find that inspiration for painting miniatures doesn't just have to come from Wargames Illustrated, WSS, or MW- I get it from all sorts of places. It pays to cast your net a bit wider than the usual historical miniature wargames forums & media. I've found lots of inspiration from the studio painters who paint insanely beautiful display pieces like seen in this type of magazine: http://www.figurepaintermagazine.co.uk/
The scale modelling community, the model railway community, fine art - all have given me ideas.
Friends also have given me nudges in certain directions- an old wargaming mate of mine, James, many years ago introduced me to the ideas behind glazing as used by the old masters in 2D art.
Having a little bit of fine art training in my background has also helped me to realise that I don't need to buy all my materials from The Army Painter etc., there's actually a lot of really cool & useful stuff at the art & craft shop.

I think that I have a lot more to say about this subject- and as my friends can attest, I can drift into lengthy monologues if I don't check myself :-)
So what do you folk think, has "failure been your friend" in this hobby? Where do you get your inspiration for painting & creating stuff? Does seeing the amazing work of others sometimes paralyse you like a rabbit caught in the headlights?
It would be great to hear what you have to say.

All the very best,
John.

Wednesday, 17 June 2015

British for A'stan & Middle East

More 28mm Moderns as part of a commission. My customer asked me to paint them as British in desert cam to fit in with his existing collection. Some of you may notice that not all the sculpts were originally of Brits,  & there's a mix of figures from Empress and Eureka I believe. Bases are left unfinished as my customer likes to do his own basing.
I quite enjoyed painting the chaps in the bomb disposal suits - something different.
I'm pleased with how these turned out, there's actually more work in these than first appearances might convey. There is a lot of detail on these sculpts, so I went back and "lined in" a lot of areas using the extremely useful Reaper Master Series Brown Liner paint.


Old Guard & a Note of Caution

 Hi Everyone! Here are some pictures of recently completed French Old Guard from North Star Military Figures Retreat From Moscow range. Plus...