I thought I would post some WIP of the Armourfast Achilles that I have been working on & off at for some time. The Achilles was sent to me by
Dan Dunbar in a swap of miniatures we did. Dan also provided some inspiration on his blog for what could be done with this fairly simple model
here. Now it has to be said that my attempt is not as detailed as Dan's, particularly the interior, but then my plan is to put a couple of AB figures in there too. So here are some pictures of the work in various stages, during which I ended up taking it apart and then sticking it back together again before I reached where I'm up to now:
This is where I got it to before I took it apart and started again......
In bits. The turret floor has been cut away to help accomodate figures, and a false floor will be added underneath this- used a bit of plasticard.
These are some shots of the turret being revamped. I have cut away the front top section to get better access of the breech area, cut out a section at the front where an mg might go and have added some other details. I got hold of some 17 pounder shells from
Peter at Battlescape , from the Sgts Mess range. Note my fairly basic breech that I made from plasticard, wire & part of a Sherman gun I had kicking about- Dan's is better, but hey, I had a go.
This is the turret at the next stage with my basic breech installed. I have added the camo net, made from surgical gauze and strips of paper then coated in watered down white glue. The backpacks and stowage on the Turret is from
Andy at Grubby Tanks apart from the balsa/plasticard box and a helmet & canteen which were cut off a plastic figure.
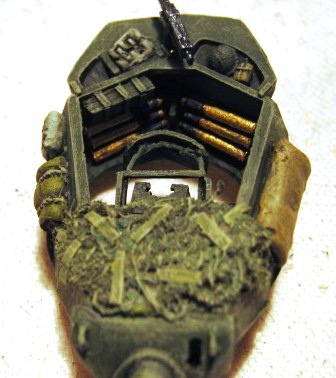
These two shots show the turret back on, but with some stowage on the back still to be painted and weathering to be done.
So here you see where I am up to so far. The weathering has been done and rest of stowage painted, now I have to finish the two figures I plan to squeeze in there. I don't have any plans for markings at the moment, I would want them to fit with my 43rd Wessex blokes- an Achilles that supported them somewhere between Hill 112 & The Island - any suggestions?


Hi JS you have done a brilliant job, when finished it will be evey bit as good as mine if not better, your paint job is alreay better then mine, well done.
ReplyDeleteOn the subject of markings during ops - and given that this is a tank hunter with camo net, then I reckon any markings would have received a field applied covering of oil + mud.
ReplyDeleteEspecially a bold red square with a dragon on it - like the 43rd had.
Perhaps splodge on some gloss varnish where the markings may be, draw it down to simulate runny oil .. and then cover over the splodge with mud (matte dark earth with beach sand mixed in), dry brush it up a little, and call it a covered up marking.
Ive got some photos somewhere of M113's where we have done that sort of field applied camo to get rid of insignia on exersize. I will try and dig up some pics for you.
Good work on the gun mount too.
Cheers
Steve
Wonderful work. Amazing!!
ReplyDeleteOut-jolly-standing! The breach is brilliant, as is, in fact, the rest of it too.
ReplyDeleteBrilliant!
Nick
Thanks you blokes, the encouragement is much appreciated.
ReplyDeletesteveoc- I shall ponder what you've said, perhaps I don't need any obvious markings after all.
Terrific work mate!
ReplyDeleteThe painting plus the weathering is spot on!
T.
That's some awesome work on such a basic kit
ReplyDeleteNice, never thought one can turn these armourfast fails in such wonderful things!
ReplyDelete