Saturday 30 January 2016

Dad's Army WIP Part 11...Captain Mainwaring & Co. get blocked in and washed

Part 11...getting closer towards the end.

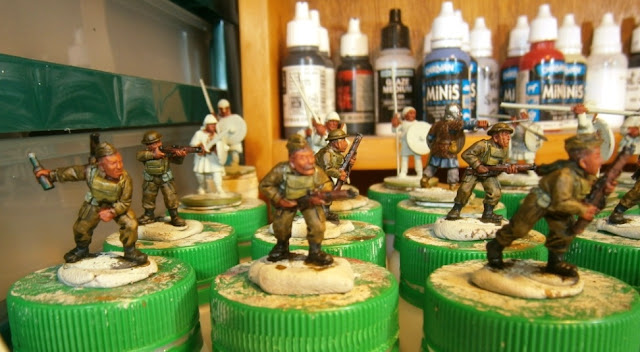
The pictures below show the rest of the figures with their basecoats and washes done:


I used the pictures on the Wargames Foundry website to give me colour ideas for the downed German Aircrew. A lot of them have their basic flight suits painted in Vallejo Khaki Grey as a base.

No blog post tomorrow, back with a new one on Monday hopefully :-)

All the best,

John.

Friday 29 January 2016

Dad's Army WIP Part 10...Some Painted, Some Prepared, and an Anglo-Saxon

G'day all,

I have stopped painting this afternoon because my hand is hurting and I don't want RSI. I didn't get any painting in this morning due to doctor's appointment and family visitors - still got some hours in this arvo before hand pain & will hopefully get some more work done Saturday.

Below are the Home Guard Bicyclists and civilians, with all their paintwork done - the Vicar even has his comb over. Hello! there's a stray Anglo-Saxon that has slipped into the left of the picture - a Dad's Army time travel episode perhaps? They've really "jumped the shark now" :-)


Below you can see the rest of our personalities and the downed German Aircrew on their painting stands. Ahhh, that Anglo-Saxon fellow has made himself scarce it seems, perhaps the limelight was too much for our friend from the "Dark Ages".


All the best to you,

John.

Thursday 28 January 2016

Dad's Army WIP Part 9....Some well known personalities make their appearance

The ninth part thereof.......

In which we go from this:


To this:


This lot includes the bicycle troops and a number of civilian personalities - the Verger, Warden Hodges, the Vicar, a german disguised as a nun, Mrs Fox, old codger (could be Mr Blewitt), a policeman, and finally a female 5th columnist with bicycle.

You may notice that I have also done prep work on the rest of the figures and have managed to get some undercoat on Captain Mainwaring, Captain Square, and Jonesy.


I have used lots of "German" colours on the lady 5th Columnist, (she is clearly an enemy agent as she has a Luger in her carry basket, along with what could be a radio or explosive device). She has colours like German Camo Dark Green on her bicycle, a Panzer Yellow for her coat, a Field Grey hat, and so on. Mrs Fox has some fox like colours, reddish browns. The German disguised as a nun has very masculine features, and when you look at the face under magnification you can actually see dots of stubble sculpted on the chin - the final figure will have a 5 o'clock shadow.

I hope you enjoy today's installment :-)

All the best,

John.

Wednesday 27 January 2016

Dad's Army WIP Part 8

Don't Panic! Part 8 is here.

Righto, here's a couple of pictures of the figures from part 7 in their finished state- (well apart from any varnishing/dullcoat). In the background of the first photo you can see the bicycle troops up on the painting stands.


Below is a picture of completed troops in a felt lined storage drawer:


I plan to do some "proper" photographs at the end, as the WIP shots don't really show them in their best light- mind you they usually look better "in the hand" anyway, despite my best efforts at taking pictures :-)

All the best to one and all,

John.

P.S. A special "shout out" to Rodger & Nick for their regular comments - thanks guys!

Tuesday 26 January 2016

Dad's Army WIP Part 7

Seven parts already? Time is flying along, and progress is being made each day.
Now that I have given you an idea of how I prepare and paint figures in previous posts, I will post regular updates of the project's progress.
In the photos below you can see the next batch already have their base colours and wash layers, plus there are some cyclists which have been glued and are waiting their turn.
Pictured are Vickers Team, Lewis Gun team, what looks like a BAR team, telephone box, bicycle, bloke using phone, a dispatch rider, and a couple of others carrying rifles.


Thanks for reading & looking at the pictures :-)
Stay tuned for the next exciting episode.
Any questions, feel free to fire away in the comments section- I will do my best to answer.

All the best,

John.

Monday 25 January 2016

Dad's Army WIP Part 6...webbing and other details


I've finished painting "Molotov" Bob and his chums now, below are some pictures of them - the only extra thing I've done since these were photographed was to paint their bases an earthy brown to tidy them up.


All the webbing has been painted back over with the original colour, leaving selected areas with the wash colour showing through. The service respirator bag has had an extra highlight by mixing the original colour with an ivory or pale flesh colour. The boots and bayonet scabbard have been highlighted with a dark grey. The rifle has been touched up with Mahogany Brown, a bit of Oily Steel mixed with black, and a leather colour on the rifle sling . The bottle has been highlighted with a variety of greens. I have painted the eyes and spectacles on the figures and mixed some grey with the hair colour.


Lots more to follow... :-)

All the best,

John.

Saturday 23 January 2016

Dad's Army WIP Part 5...Painting British Battledress

Here's how I paint British Battledress. This is over the base I created with Vallejo English Uniform, washed with Secret Weapon Blue Black. I know other folks will have combinations of colours that they like, but these are the colours that I have found work best for me:

Vallejo English Uniform, Green Brown, and Khaki.
English Uniform is painted back over the figure, leaving the wash/foundation layer in the creases and where shadows are more likely.
First layer is English Uniform.
 Next I use Green Brown for a highlight on areas that would be more exposed to light that is roughly overhead. This is demonstrated on the back of the figure below.

Green Brown over English Uniform
 The final highlight is Khaki, applied to areas that would get the most light - knees, tops of arms, cap, etc.
Khaki Highlight -front

Khaki highlight -back

The next post will show this set of figures with all the details painted up, including eyes, webbing, weapons, and "Molotov" Bob's bottle :-)

Thanks to those who have left comments so far, always great to know that others find this stuff useful.

There will be no post tomorrow, hope to be back with another on Monday.


Friday 22 January 2016

Dad's Army WIP Part 4...How I paint the fleshtones

G'day all, the next exciting episode for you! This time I'm giving a breakdown of how I'm doing the flesh areas on these figures. These are the typical colours that I use for "European" skin-tones....well, unless they've been stationed in the Western Desert for a while ;-)

I'm going to focus on a single figure so I can demonstrate my process a bit better. I shall call him "Molotov" Bob! Below is Bob with his foundation colours plus his various washes:


The first colour of choice is Reaper Bright Skin Shadow, applied with a No.1 da Vinci Kolinsky sable brush.


Here's what Bob looks like after this layer:


Notice that the foundation/wash areas have been left in the areas around the mouth, nose, ears, below the chin, at the wrists, and between the fingers (click images to enlarge).

My next colour layer is Reaper Bright Skin:


Here's Bob after his this layer:


These layers are placed on the edges of the ears, hand, knuckles, nose, top of cheekbones, part of forehead, and fine lines above the top lip.

For the final highlight I use Reaper Bright Skin Highlight and a size 0 brush (same make /type as before, just finer).


Now some pictures of Bob with these final touches to the flesh areas:


One of the keys with the final highlights is not to be heavy handed, small, fine strokes or dots will do. Place these highlights on the tip of the nose, top of the cheekbone, tips of ears (if not under a hat), top of forehead, knuckles, top surface of hand, and fine lines above top lip.
I used to put highlights on the chin, but after some further reading and observation this seemed unnecessary for this scale - unless you are painting a figure with a hugely exaggerated jaw/chin.

Here's the batch with the flesh areas done. Painting the eyes/spectacles and hair is done later.


I hope this proves informative, as well as an interesting comparison with what the figure looked like with just the washes.
In my next post I hope to bring you a step by step of how I paint the Battledress, including the triad of colours I use.

All the best,

John.

Thursday 21 January 2016

Dad's Army WIP Part 3...Washes

OK, here's the part where the washes get applied. Rather than go for an overall wash in one colour, I have opted for four coloured washes for different parts of the figures. Washes not only put some handy shading in creases etc., they also create another colour. To my  mind this works out as a pairing of lining-in & glazing;  how much of this new colour you want to leave showing is up to you. When you look at the pictures at the end of the post you will see how the creases and shadows have been defined, and new colours created by overlaying the semi-translucent wash over the top of the foundation colours, (you may want to compare these with how they looked in the previous post).

The first wash I apply is the flesh wash. My flesh wash is a homemade mix - see picture below for a visual of the mix. it is composed of mostly Daler Rowney Red Oxide acrylic ink, with some Reaper Brown Ink & Reaper Flow Improver (I can't tell you the exact proportions because I don't know them :-), I just stopped when I thought it looked about right.)

Flesh Wash combo

Next up, the majority of the uniform gets a wash of Secret Weapon Blue Black - I think this colour is excellent for British Battledress, to my eye it is complimentary. I would not use this coloured wash over German Field Grey uniform for instance, I would probably use a brown instead. Over a red uniform I would use Secret Weapon Green Black.

The next wash to be applied is Secret Weapon Sewer Water (don't worry, it doesn't smell like a sewer). This is put on the helmet and the boots.

My final wash is P3 Armour Wash, this is applied to the weapons - doesn't matter if it goes on the woodwork too, that can get tidied up later.
I like this product from P3 for all metal work, works a treat. Once it's dry you can always go back over with some metallic paint if you want some extra shiny bits :-)


Below are the brushes I use for most of my washes. They are soft brushes with natural fibres, but nothing fancy like sable.


Here's what the figures look like once their washes have dried:


A close up of some of 'em:


They look much darker now, but not too dark. In the next stage I will go back over the figures with original colours plus some new ones, leaving some of the glaze colour where I want it.
In the next post I will show you how I paint the flesh on these figures.

All the best,

John.

Wednesday 20 January 2016

Dad's Army WIP Part 2...blocking colours

OK, this is the bit where I list the basic colours I've used for blocking in. These act as the foundation colours over which washes will be applied, followed by overpainting, highlighting and detailing.

I find it hard to take decent pictures at my wee workspace, so please bear with me :-)

Below are the first thirteen figures with all their foundation colours blocked in.


These are the colours I have used:

  • Reaper HD Sunburn Flesh for skin areas
  • Vallejo Brown Violet for helmets
  • Vallejo Black Grey for boots and bayonet scabbard
  • Vallejo English Uniform for battledress & caps
  • Vallejo Green Ochre for helmet chin straps and extra bags (not service respirator bag)
  • P3 Thrall Flesh - regular webbing
  • Vallejo Yellow Green - Service Respirator bags
See picture below.


Paints continued...

  • Vallejo Mahogany Brown for Rifles/Gun stocks
  • Vallejo German Grey - gaiters & metal work on guns
  • Reaper Ruddy Leather- rifle slings
  • Vallejo Olive Grey- scarves on a couple of the figures
  • Vallejo German Cam. Black Brown  for hair
  • Reaper Peacock Green for Molotov Cocktail bottle
See picture below.


That's quite a lot of different colours for what looks like a fairly straightforward uniform I guess :-)

Below is a picture of the wet palette that I use for my main painting tasks. Hmmm, think that paper might  need changing soon :-). I find a wet palette essential for my work, especially in the hot corner of the living room where my workspace is - our summer weather dries the paint out fast.


My next post will be about the wash stage. I will be using four different wash colours for this.
Cheers,
John.

Tuesday 19 January 2016

Dad's Army WIP Part 1

This is my first work in progress post for the Dad's Army project. My plan is to take the pictures and post them next day, so what you are seeing are yesterday's photos.
Today's post is fairly straight forward prep stuff - filing, gluing & undercoating.
Next post will give you the stuff most of us are interested in when looking at a painting post - "What colours do you use?"

I am starting out with two blisters of rank and file Home Guard to "get my eye in".
The figures themselves don't need a lot of tidying-up, the casts are quite clean. A minor bit of filing on the bases, and a very gentle flex of the pewter to make sure they can all stand up on their own. There is a wee bit of clipping on two of the figures which have separate rifles with hand attached.

These are the basic tools I use for getting metal figures ready: a set of various shaped files; some clippers; and an old craft knife.

These two figures are carrying their rifles in their left hands. The rifles have the left hand cast on and just need a bit of superglue to affix them. They will be left to cure and undercoated the following day.
 Undercoating...
Nowadays I undercoat all my figures with the excellent Background range of paints from Derivan Matisse. Previously I used their Pale Grey, but now I prefer the slightly darker green-grey of Gum Tree Green (they are an Aussie paint manufacturer). The Background paints are designed for sealing artists canvases or boards prior to painting, and so not only give a great seal over the figure, but also a good "tooth" on which to apply paint. I am not a fan of black undercoat, it does stuff to colours laid over it in my opinion, and I think white a bit too stark - I favour a neutral starting point, not too dark, not too light. The brush I use to undercoat with at the moment is an inexpensive No.10 synthetic round. Undercoating brushes get worked pretty hard, so I don't advise using your best sable :-)

After giving the undercoat a thorough shake I get some paint from the inside of the lid and lay it on my disposable waxy paper palette, and start undercoating. Sometimes little patches get missed in the undercoating stage, that is where washes and lining in come into their own in the latter stages.
I picked up the pad of disposable palette paper from an art shop, it has been really useful.

The figures are stuck down with Blu-Tack onto empty pill bottles or similar - my favoured ones were some sort of yoghurt drink. The bottles have some rocks in them to prevent them from toppling like dominoes :-)
Undercoat/Sealer & undercoating brush. Undercoat is dispensed onto the disposable paper palette.

Here are the figures with their undercoat on - first two rows,  figures in the back are part of my slow burn Anglo-Saxon project. The two figures on the left are waiting for the super-glue to cure. Rest of the blister packs have been organised into separate clip-seal bags.


Stay tuned for the next post where you will find out what my base or blocking colours are :-)

Old Guard & a Note of Caution

 Hi Everyone! Here are some pictures of recently completed French Old Guard from North Star Military Figures Retreat From Moscow range. Plus...